Playing with Pi-Star
Unofficial notes on setting up and getting started with Pi-Star hotspots
Revised: Sep 24, 2023![]() ; Versions: V4.1.6
; Versions: V4.1.6![]() · 20230924
· 20230924![]() ; CC BY-SA
; CC BY-SA![]() ;
PDFs
;
PDFs![]()
As of Jan 1, 2024, these Playing with Pi-Star notes are no longer being actively updated. They will remain available for some time for legacy reference.
Most up-to-date version: amateurradionotes.com/pi-star.htm
Please note: These are my personal notes based on setting up and getting started with using Pi-Star hotspots. I'm a non-technical user figuring things out as I go along, as well as by learning from others. The focus is personal, low-power hotspots![]() (not repeaters). I'm sharing these notes just in case they might help anyone else get started. If anything needs correcting, please let me know
(not repeaters). I'm sharing these notes just in case they might help anyone else get started. If anything needs correcting, please let me know![]() .
.
I'm not affiliated with the Pi-Star project and I'm not providing support. If you need additional help or have more advanced questions, here are some good resources:
Official Pi-Star website![]() , user forum
, user forum![]() , support group
, support group![]() , tutorial videos
, tutorial videos![]() .
.
Note: Pi-Star is built upon the foundation of MMDVM created by Jonathan Naylor, G4KLX. Jonathan shares his work freely with the amateur radio community.
1) Learning Pi-Star
Pi-Star is digital voice software for personal, low-power hotspots![]() , as well as repeaters. It can handle DMR
, as well as repeaters. It can handle DMR![]() , D‑STAR
, D‑STAR![]() , and YSF, as well as P25, NXDN, POCSAG, and multiple cross modes when used with a multi-mode digital voice modem that supports those modes.
, and YSF, as well as P25, NXDN, POCSAG, and multiple cross modes when used with a multi-mode digital voice modem that supports those modes.
Andy Taylor, MW0MWZ, the main developer, says this on his Pi-Star website![]() :
"Pi‑Star can be whatever you want it to be, from a simple single mode hotspot running simplex providing you with access to the increasing number of Digital Voice networks, up to a public duplex multimode repeater!"
:
"Pi‑Star can be whatever you want it to be, from a simple single mode hotspot running simplex providing you with access to the increasing number of Digital Voice networks, up to a public duplex multimode repeater!"
Pi-Star is relatively easy to set up for a personal hotspot, so don't be put off by the length of this article. It's long because it covers a lot of the rich set of features and configuration options, beyond what's needed to set it up for the first time.
1a) To get up and running
★ Go through the setup steps in sections 1 - 5, marked with a solid red star.
☆ Also go through the steps marked with an outlined red star for the modes you want to use. Choose from DMR, D-STAR, YSF, P25, NXDN, and POCSAG.
1b) Having trouble?
For some hints about how to proceed, see: Pi-Star troubleshooting![]() .
.
1c) Using D-STAR? Be sure to set up your radio properly!
For most simplex hotspots, you must use D-STAR Repeater (DR) or Duplex mode: set up RPT1, RPT2, and a zero offset (either +/−0.000). See: Use DR mode![]() and D-STAR Radio Primer for using Pi-Star
and D-STAR Radio Primer for using Pi-Star![]() video by Craig, W1MSG.
video by Craig, W1MSG.
★ 2) Downloading Pi-Star
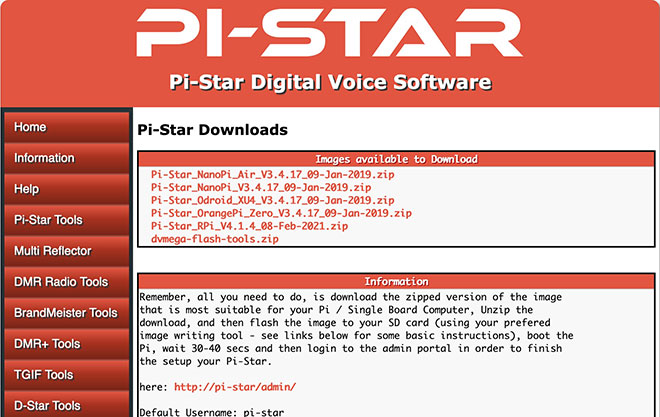
If your hotspot came with a microSD card loaded with the Pi-Star image, skip ahead to step 3a. Otherwise, download the image from Pi-Star Downloads![]() to a Windows, Mac, or Linux-based computer (not the hotspot). If your hotspot uses a Raspberry Pi, download the RPi image. Pi-Star 4.1.x works for hotspots based on all Raspberry Pi boards, and must be used for hotspots based on a Raspberry Pi 3B+, 3A+, or 4B board.
to a Windows, Mac, or Linux-based computer (not the hotspot). If your hotspot uses a Raspberry Pi, download the RPi image. Pi-Star 4.1.x works for hotspots based on all Raspberry Pi boards, and must be used for hotspots based on a Raspberry Pi 3B+, 3A+, or 4B board.
★ 3) Flashing Pi-Star
Extract the downloaded Pi-Star image zip file, and then flash the image file itself (ends in .img) to a 4GB or higher microSD card. A good app for this is Etcher by balena![]() , available for Windows, Mac, and Linux.
, available for Windows, Mac, and Linux.
You can dismiss any system message you get that says you need to format the microSD card when you first insert it or after you finish flashing the image. Etcher formats the card, writes the image, and verifies it was written correctly.

★ 3a) Preparing to connect to WiFi
Using the built-in Auto AP (Auto Access Point) method
If you're using Pi-Star 3.4.11 or later with a recent Raspberry Pi* and Auto AP is enabled (which is the default), you don't need to do anything else to prepare to connect to WiFi. You can jump to section: 3b) Preparing for first boot up.
*Zero W/2 W, 3B, 3B+, 3A+, or 4B. Also works with some WiFi dongles: list of dongles that work![]() .
.
Manually preparing to connect to WiFi
If you can't use Auto AP or you just like to do things manually, after you finish flashing the image to a microSD card, you can manually add your initial WiFi settings to the boot partition so they'll auto-install on first boot up:
- Create a wpa_supplicant.conf file with your WiFi settings:
- Use the Pi-Star WiFi Builder
 tool on the Pi-Star website.
 - Or, create your own: Manually adding WiFi settings to RPi
 .
.
- Use the Pi-Star WiFi Builder
- Copy the wpa_supplicant.conf file to the microSD card's boot partition. Note: The next time you boot up Pi-Star, the file is automatically moved to /etc/wpa_supplicant/, so you won't find it in the boot partition anymore.
★ 3b) Preparing for first boot up
Grab a cup of coffee or tea and insert the microSD card into your hotspot.
★ 4) Booting up Pi-Star
Okay, take a deep breath: step 4 can be the most challenging one. What you need to do depends on your circumstances. Do all the following that apply:
Overview of Pi-Star Auto AP boot-up steps for a new wireless network:
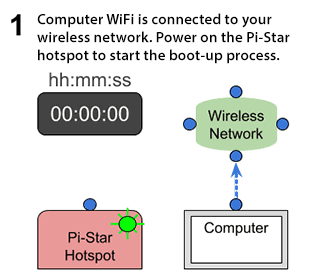
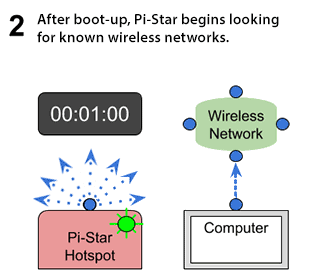
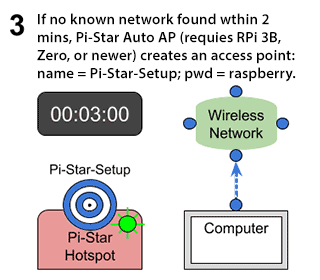
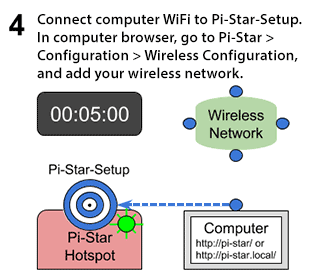
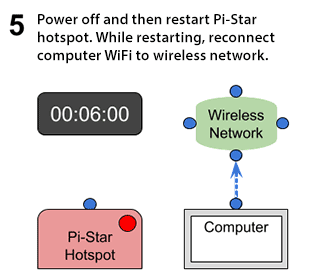
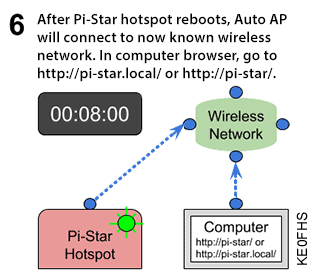
PDF: 2-Pi-Star_Auto_AP.pdf · Related video: Pi-Star WiFi Auto AP![]() by Craig, W1MSG
by Craig, W1MSG
★ 4a) For all boot-ups
- Power on your hotspot.
- Wait for Pi-Star to boot up, which normally takes a minute or so (a bit longer when using a slower Raspberry Pi like the RPi Zero W).
Note: If your hotspot has an external display attached to its Raspberry Pi (unusual), you can watch Pi-Star start up until the login prompt is displayed, but don't log in there because you can't set up Pi-Star via the hotspot.
★ 4b) If using Auto AP and setting up a new WiFi connection
Perform this step when you start Pi-Star for the first time or when you need to connect to a new WiFi network, for example, when traveling. When Pi-Star doesn't find a known network within about three minutes after power on, Auto AP will automatically activate its own access point, and you'll use that to connect to Pi-Star in order to configure WiFi settings.
- Wait at least three minutes for Auto AP to activate its access point.
- On a Windows, Mac, or Linux-based computer (not the hotspot itself) that has WiFi enabled, look in the WiFi settings to find the Pi-Star access point, and then select it to connect to it:
- If you're starting Pi-Star for the first time, it'll be named "Pi-Star-Setup." This is what it looks like on a Mac:
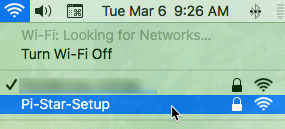
- If this isn't the first time, but you need to connect to a new WiFi network, it'll be named using the hotspot's hostname, by default, "pi-star" (or whatever you changed it to in the General Configuration settings).
- If you're starting Pi-Star for the first time, it'll be named "Pi-Star-Setup." This is what it looks like on a Mac:
- Enter the Pi-Star-Setup network security password: raspberry.
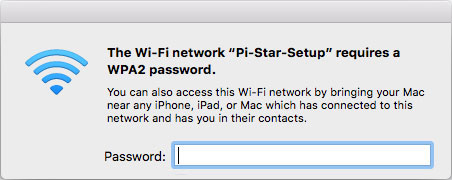
- Note: Depending on your computer, the network password may be called the WPA2 password, the Network Security Key, or something else. You may need to enter the password a few times.
★ 4c) For all boot ups
On a Windows, Mac, or Linux-based computer (not the hotspot itself) that has WiFi enabled, open a browser window and navigate to:
- Windows: http://pi-star/
- macOS, iOS, etc. (also works on my Windows 10 laptop): http://pi-star.local/
Note: On some mobile devices, the url won't work. In that case, you can try the Auto AP mobile IP address: 192.168.50.1
★ 4d) If starting Pi-Star for the first time
You'll be greeted by a "No Mode Defined" screen, which is normal because you haven't yet configured the mode to use.

- At this point, you can either click the Configuration link or wait 10 seconds to be redirected automatically to the Configuration page.
- If you're running Pi-Star 4.1.2 or later, you won't need to authenticate (this applies only when using Auto AP). If you're running an earlier version of Pi-Star, Configuration requires signing in. The default user name is pi-star and the default password is raspberry (all lowercase). You can change the default password later on in the configuration process.
★ 4e) If using Auto AP and setting up a new WiFi connection
Perform this step when you start Pi-Star for the first time or when you need to connect to a new WiFi network, for example, when traveling.
- If you're not already in Configuration view, click the Configuration link and log in with your Pi-Star user name and password.
- In the Configuration view, scroll down to the Wireless Configuration section.
- To add or modify your WiFi network connections, click Configure WiFi.
- Select your country code and then click Scan for Networks. Wait 10 secs.
Note: If the scan doesn't find the network you want, you can add it manually, as discussed below: 5k) Wireless Configuration.

- In the list of networks found, select the one you want.

- PSK: Type the wireless network password. The PSK field will turn green.

- Click Save (and connect). When Auto AP is active, this step will only save; it won't connect. Wait a few moments for it to save (PSK field will turn white again), power off your Pi-Star hotspot, and then restart it.
- While the hotspot is restarting, reconnect your computer to the regular WiFi network you're using.
- After the hotspot restarts, Pi-Star will connect to the new WiFi network you added. On a Windows, Mac, or Linux-based computer (not the hotspot itself) that has WiFi enabled, open the Pi-Star dashboard by navigating again to: http://pi-star/ or http://pi-star.local/.
If you can't re-open the dashboard, see the note Trouble re-opening the dashboard after updating .
.
Congratulations! You've finished the most difficult part of setting up Pi-Star.
★ 5) Performing initial Pi-Star configuration
After authentication, the Configuration view is displayed. I'm going to discuss these configuration settings in three parts: 5.1) Basic, 5.2) Digital mode, 5.3) Additional.
★ 5.1) Basic configuration settings
This first set of configuration settings covers the Control Software, MMDVMHost Configuration (if MMDVMHost is enabled), and General Configuration.
- 5a) Control Software
- 5b) MMDVMHost Configuration
- 5c) General Configuration
- Jump down to: 5.2) Digital mode configuration settings
- Jump down to: 5.3) Additional configuration settings
★ 5a) Control Software
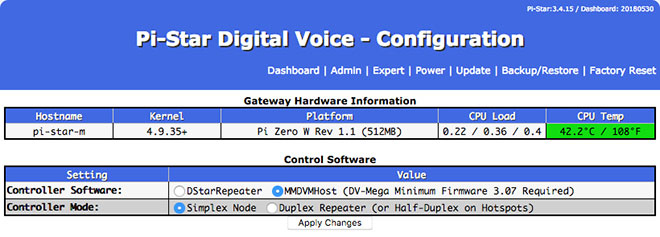
( Why is this blue? Because just for fun I changed the app's colors using Pi-Star's CSS Tool![]() . )
. )
- ★ Controller Software
- MMDVMHost is selected by default and is the right choice in most cases. (MMDVM stands for Multi-Mode Digital Voice Modem).
- Note: The DVMEGA has minimum firmware requirements for MMDVMHost: for DMR = 3.07; for YSF = 3.14. More info: DVMEGA firmware update
 .
.
- Note: The DVMEGA has minimum firmware requirements for MMDVMHost: for DMR = 3.07; for YSF = 3.14. More info: DVMEGA firmware update
- If you'll be using only D-STAR mode with older hardware like DVAP or DVRPTR, select DStarRepeater.
- MMDVMHost is selected by default and is the right choice in most cases. (MMDVM stands for Multi-Mode Digital Voice Modem).
- ★ Controller Mode – For a personal hotspot, choose Simplex Node. For a dual hotspot, choose Duplex Repeater.
- ★ Click Apply Changes – Do this the very first time you configure Pi-Star whether or not you make Control Software changes because Pi-Star needs to know which Controller Software and Mode you want to use.
- If you chose DStarRepeater, skip down to 5c) General Configuration.
★ 5b) MMDVMHost Configuration
The section is displayed only if you chose MMDVMHost as Controller Software.
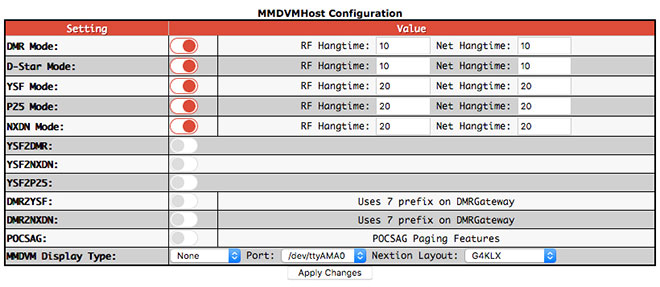
- ★ Modes – During initial setup, enable all the modes you want to use so you'll have access to all their configuration options. Subsequently, enable only the modes you want to use at any given time. The mode configuration options are discussed below in the Digital mode configuration section.
- Note: While running multi-mode is possible, many people run only one mode at a time, or have multiple hotspots, each running a separate mode. Andy Taylor posted about using multiple modes in a reply to a related discussion in the Pi-Star Users Support Group: "My best advice for operating multi-mode is to turn on the modes you want—and leave them un-linked at startup, and only link when you want to (doing so from the radio in your hand) and un-link when you are done—this means the hotspot is always ready to go in the mode you want when you want."
- Hangtime – Related to multi-mode use. Time to stay in mode after RF (Radio Frequency, measured from the beginning of a transmission) or network reception. For starters, the defaults are fine.
- Note 1: The RF (Radio Frequency) hang time is measured from the beginning of a transmission. Per Andy Taylor: Hangtimes "set the amount of time that mode is 'sticky' – so if you have an incoming call over DMR from the network, how long would you like to stay stuck to DMR mode." Also, he suggests "longer timers for RF than network, so 120 secs for RF, maybe 90 secs for network … experiment and see what works the best." See also the video Pi-Star Hang Time Update
 by Craig, W1MSG.
 - Note 2: Per Andy Taylor's replies in the Pi-Star Users Support Group, the DVMEGA is snappy when running a single mode, but can be a bit sluggish if you're running multiple modes because it needs about 1.5 seconds of RF to determine what the incoming mode is in order to latch onto it. In that case, it can be helpful to extend the hang time to something like 90.
- Note 1: The RF (Radio Frequency) hang time is measured from the beginning of a transmission. Per Andy Taylor: Hangtimes "set the amount of time that mode is 'sticky' – so if you have an incoming call over DMR from the network, how long would you like to stay stuck to DMR mode." Also, he suggests "longer timers for RF than network, so 120 secs for RF, maybe 90 secs for network … experiment and see what works the best." See also the video Pi-Star Hang Time Update
- POCSAG – Enables POCSAG paging. See below: POCSAG Configuration.
- MMDVM Display Type – If you're using a display, select:
- Type of display: OLED Type 3 (0.96″), OLED Type 6 (1.3″), Nextion, HD44780, TFT Serial, or LCDproc.
- Note 1: The hangtime also impacts how long data remains on your display.
- Note 2: To learn more about Nextion screens, visit the Nextion Screens
 group or the Nextion Ham-Radio Screens
 Facebook group, both moderated by Dutch ham and digital voice enthusiast Rob, PD0DIB.
 - Note 3: For info about Nextion Model 8 (supports touchscreen), see Rob's GitHub repository, Nextion_HAM-radio-screens/MODEL 8/
 , and the NEXTION DRIVER by ON7LDS FAQ
- Note 4: There are some fundamental and optional OLED settings available via the Expert Editor on the MMDVMHost page in the OLED section:
- Set OLED Type: 3 = 0.96″ or 6 = 1.3″. After applying changes, reboot Pi-Star.
- Change rotation: Rotate = 0 or 1. Thanks to work done by mreckhof, K5MRE
 , merged into MMDVMHost by Jonathan, G4KLX, and implemented into Pi-Star by Andy Taylor.
 - Invert background: 0 = white text on black background or 1 = black text on white.
- Scroll (mode label when active): 1 = Yes or 0 = No.
- Change brightness: 10 = bright or 0 = less bright (effect varies by modem board).
- LogoScreenSaver: 0 = off (blank screen) or 1 = on (logo displayed).
- Thanks to Scott, VK7HSE, for this one: If your OLED display has garbled text, check your Display Level in the Expert Editor > MMDVMHost > Log section. It must be set to 0.
- Port you're using: Modem, /dev/ttyAMA0, or /dev/ttyUSB0.
- Note: On my MMDVM-based hotspots, I select:
- Modem for a Nextion Model 7 display connected to the Serial through-holes.
- /dev/ttyUSB0 for a Nextion display conencted to the USB port on the Raspberry Pi.
- Note: On my MMDVM-based hotspots, I select:
- Nextion layout: G4KLX or ON7LDS L2, L3, or L3 HS.
- Note 1: For my custom ON7LDS screens, I select ON7LDS L2.
- Note 2: For a good summary explanation of the differences between the layout types, see the Pi-Star User Forum "Screen layout" post
 by Ryan, WA6HXG as well as his GitHub project page, which includes a variety of nice layouts: WA6HXG/MMDVM-Nextion-Screen-Layouts
 . Ryan also posted some quite good installation instructions
 .
. - Note 3: For a selection of Nextion screen layouts as well as the more detailed readme explanations of the differences between the layouts, see the Nextion subfolders of the g4klx/MMDVMHost GitHub page
 .
. - Note 4: Rob, PD0DIB, has a nice selection of Nextion screens on GitHub, as well as very good instructions, including for the newer version 8 driver, which adds touch-screen functionality: PD0DIB/Nextion_HAM-radio-screens
 .
.
- Type of display: OLED Type 3 (0.96″), OLED Type 6 (1.3″), Nextion, HD44780, TFT Serial, or LCDproc.
★ 5c) General Configuration
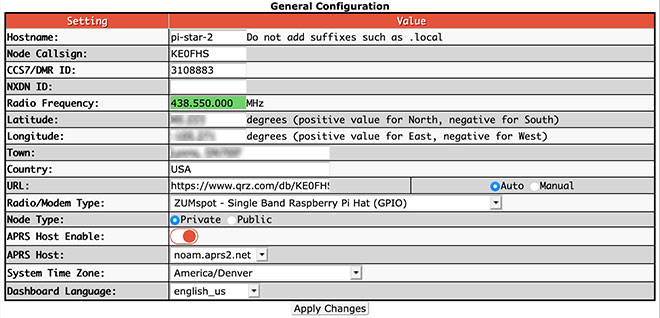
- Hostname – You can give your hotspot a unique hostname. For example, if you're running two hotspots simultaneously, you'll need different hostnames for each, such as pi-star and pi-star-2. If you do change the hostname, you must power off and restart the hotspot before it takes effect.
- Note: You'll need to use the new hostname to open Pi-Star in a browser, for example: http://pi-star-2/ or http://pi-star-2.local/. However, this does NOT change the authentication user name, which remains pi-star.
- Important! If you run more than one hotspot at a time, in addition to using different hostnames, you must use different frequencies. If you don't, you can cause serious interference (looping) on the reflector, talkgroup, or room you're linked to, which prevents others from using those resources. You can get banned, sometimes permanently, from a resource for causing that kind of issue.
- ★ Node Callsign – For a hotspot, enter your own callsign.
- ☆ CCS7/DMR ID – If you have DMR Mode enabled, enter your CCS7 ID. For more info, see: Register for CCS7 ID
 .
. - ☆ NXDN ID – If you have NXDN Mode enabled, enter your ID. For more info, see: NXDNInfo.com
 .
. - ★ Radio Frequency – For a simplex hotspot, this is the frequency used for connecting your radio and hotspot. For a duplex hotspot, you'll see entries for both an RX and TX frequency (these are the hotspot frequencies, the opposite of those used by your radio).
- Important! Avoid frequencies used for other purposes, for example, 435.0 - 438.0 and 145.8 - 146.0, used internationally for satellite communication, which can be disrupted by even low power hotspot transmissions.
- Pi-Star reminder: Beginning with dashboard v20181216, when you change a frequency, the frequency field displays red when it is within the satellite range and green when it is safely outside that range. Pi-Star itself doesn't enforce frequency ranges; however, hotspots running firmware ZUMspot/MMDVM_HS v1.4.12 or later
 won't work on satellite frequencies.
 - Band plan: See your country's band plan and your local frequency use plan. For example, for the U.S., see: U.S. Band Plan
 . For the U.S. State of Colorado, see: Colorado Frequency Use Plans
 (especially, CCARC Guidelines on Hotspots
 ). To find links for other U.S. states, refer to the Amateur Radio: Frequency Coordinators
 list by Tom, W2XQ. See also the info posted by Ron, VE1AIC: Digital Voice frequencies
 .
.
- ★ Lat, Lon, Town, QTH Locator grid square, and Country – This is where the hotspot is located. To find your locator grid square, use a service like APRS.fi
 . Location info is used for your BrandMeister hotspot listing. In addition, per Andy Taylor in the Pi-Star Users Support Group: "If you are running D-Star mode, and you add your position information to the dashboard, you will get D-PRS positioning from ircDDBGateway." See also the note: Prevent sending APRS info via BrandMeister.
 - ★ URL – Based on the hotspot callsign, this link is presented to the networks you connect to, for example, BrandMeister. By default, the link is to QRZ: https://www.qrz.com/db/[CALLSIGN]. If you want to use this, select Auto; alternatively, you can select Manual and add whatever link you want, for example, a link to your own website.
- ★ Radio/Modem Type – The Pi-Star RPi image supports a bunch of radio/modems running on the Raspberry Pi. For a full list, see the note: Radio/modem types supported
 .
.
- Note: As of the 20220511 update, option lists with more than 30 options, like the Radio/Modem Type and DMR Master lists, have a search box at the top of the list.
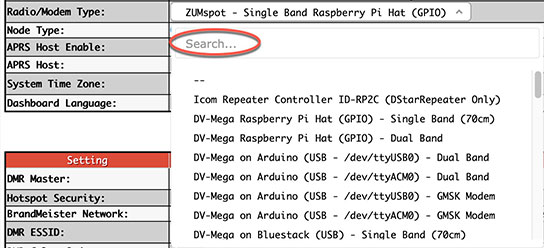
- Note: As of the 20220511 update, option lists with more than 30 options, like the Radio/Modem Type and DMR Master lists, have a search box at the top of the list.
- ★ Node Type – Determines whether radios with callsigns (D-STAR, YSF), CCS7 IDs (DMR, P25), or NXDN IDs other than what is entered in the Pi-Star General Configuration Node Callsign, CCS7/DMR ID, and NXDN ID can access the hotspot. When selecting this, keep in mind the regulations in your country pertaining to the control operator function. For a personal hotspot in the U.S., you can set this to Public, but unless you actually intend to allow radios with other callsigns, CCS7 IDs, or NXDN IDs to access the hotspot, it may be best to leave it set to Private. See also Hotspot best practices
 .
.
- Note 1: The Node Type controls each mode's SelfOnly setting in Expert Editor > MMDVMHost.
- Note 2: If you're using Node Type = Public and DMR, an additional option is displayed:
☆ DMR Access List – You can create a comma-separated list of the DMR IDs that should have access to the hotspot. If you leave this blank, a yellow highlighted alert will be displayed above the dashboard: "Alert: You are running a hotspot in public mode without an access list for DMR, this setup *could* participate in network loops!"
- ☆ APRS Host Enable – When enabled (default), your location will be public.
- ☆ APRS Host – Select your preferred APRS host, typically one of the rotating hosts or a nearby host server.
- Note: Per Tom, W1TG, in the Pi-Star User Forum: There are over 80 different T2 APRS Hosts around the world. A really good "Best Practice" is to select one of the Automatically Rotating T2 APRS Hosts. The Rotating Host will always get you to a working Tier2 APRS Server and if that link fails for some reason it'll move onto another working server.
If you select an APRS Host without the Auto Rotate function and the server has a malfunction or goes offline, it can cause issues with your hotspot such as spontaneous disconnects.
T2 APRS Host Servers that provide the Auto Rotate Function:
- rotate.aprs2.net (World Wide)
- noam.aprs2.net (North America)
- soam.aprs2.net (South America)
- euro.aprs2.net (Europe)
- aunz.aprs2.net (Australia/New Zealand)
- asia.aprs2.net (Asia)
- Note: Per Tom, W1TG, in the Pi-Star User Forum: There are over 80 different T2 APRS Hosts around the world. A really good "Best Practice" is to select one of the Automatically Rotating T2 APRS Hosts. The Rotating Host will always get you to a working Tier2 APRS Server and if that link fails for some reason it'll move onto another working server.
- ★ System Time Zone – Select the hotspot's time zone.
- ★ Dashboard Language – Select the language for the dashboard.
If any changes made, click Apply Changes.
★ 5.2) Digital mode configuration settings
☆ Configure the mode(s) you'll be using. Hint: If you're configuring Pi-Star for the first time, start with just one mode in order to become familiar with Pi-Star.
- 5d) DMR Configuration (including DMR cross modes)
- 5e) D-STAR Configuration
- 5f) Yaesu System Fusion Configuration (including YSF cross modes)
- 5g) P25 Configuration
- 5h) NXDN Configuration
- 5i) POCSAG Configuration
- Jump up to: 5.1) Basic configuration settings
- Jump down to: 5.3) Additional configuration settings
☆ 5d) DMR Configuration
How you configure DMR depends on the DMR Master you select. All of the Master choices include four basic DMR options—ESSID, Color Code, EmbeddedLCOnly, and Dump TAData—displayed below the selected DMR Master, which are described in more detail below.
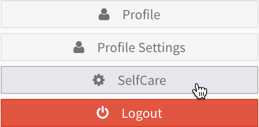
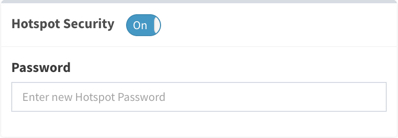
If you choose a BrandMeister Master, you'll also see the BM Hotspot Security password option, as well as links to BrandMeister Repeater Info and SelfCare:
Important! Per the BrandMeister USA 2021 Summer Updates newsletter⩘ : "Hotspot Security will now be required for all simplex and duplex hotspots connecting to BrandMeister world-wide starting Oct 1, 2021. This means you are required to set a hotspot security in the dashboard and then enter the same password into your hotspots. You will not be able to use the default password of "passw0rd". See the step by step instructions by visiting BrandMeister USA Hotspot Security![]() . This applies to 7-digit and 9-digit radio IDs only. Finally you may have already noticed there is no longer an option to enable/disable Hotspot Security in Selfcare due to this new requirement. For more, see BrandMeister News
. This applies to 7-digit and 9-digit radio IDs only. Finally you may have already noticed there is no longer an option to enable/disable Hotspot Security in Selfcare due to this new requirement. For more, see BrandMeister News![]()
If you choose a DMR+, FreeDMR, or HB Master, you'll also see a field for Options:

If you choose the DMRGateway Master, you'll see options for three networks—BrandMeister, DMR+, and XLX—in addition to the basic options:
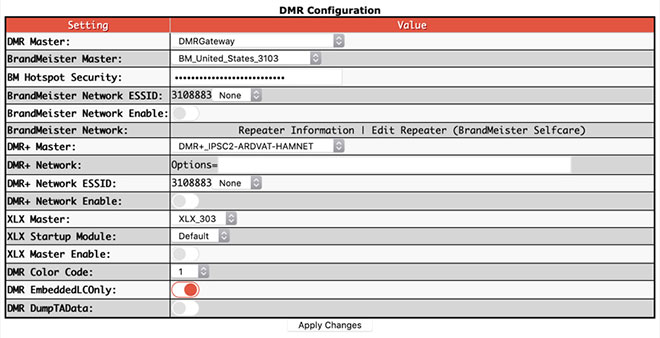
- ☆ DMR Master (a master server connects you to the rest of the system):
- If you want to use only a specific system – Choose a BrandMeister (BM), DMR+, FreeDMR, TGIF, or HB master. With any of these, everything is simpler as you'll see only options specifically for the selected system.
- Note: If you use BrandMeister SelfCare
 (and you should!):
- Set up one SelfCare account for each CCS7 ID you use with BrandMeister.
- For the U.S. servers and in some other countries, a BrandMeister Hotspot Security password is required (will be required for all countries as of Oct 1, 2021). See the bullet point below about BM Hotspot Security for more details.
- It's important to note that your SelfCare settings are saved per master server. If you change to a new master server, you need to re-enter settings you want to use.
- You can turn on Pi-Star's BrandMeister Manager module, which gives you access to key BrandMeister settings in Pi-Star's Admin view. For more info, see: Pi-Star's BrandMeister Manager module
 .
.
See also: Using the BrandMeister API by Vladimir, AC2F .
. - You can turn off sending APRS info via BrandMeister. For more info, see the note: Prevent sending APRS info via BrandMeister
 .
. - To choose a good BrandMeister DMR Master, see How to select a BrandMeister Server

- Note: If you use BrandMeister SelfCare
- If you want access to multiple systems simultaneously – Choose DMRGateway 1 as your DMR master, and then you'll see options for BrandMeister, DMR+, and XLX.
- Note 1: If you use DMRGateway, you can fine tune the settings for individual systems, which is discussed below: Expert Editor ⟩ Quick Editors ⟩ DMRGateway.
- Note 2: The DMR2YSF and DMR2NXDN masters are discussed below in the DMR cross-mode configuration section.
- Note 3: From a Pi-Star User Forum post
 by Andy Taylor: "Keep in mind then when using DMRGateway, if a network is active … then DMRGateway is listening there until that traffic stops, it then stays listening there until the Net Hangtime for DMR expires. So, if you try to use [a different network] within that time, it really won't work. This is why less is more when it comes to pinning talk groups and using DMRGateway."
 - Note 4: If you're comfortable tweaking Pi-Star expert settings, you can customize how DMRGateway is configured. See Github: g4klx / DMRGateway / Rewrite Rules
 . For example configurations, see the Pi-Star User Forum topic DMRGateway for a dumb smart person
 , especially the post by VE3RD dated Dec 16, 2019. For TGIF Rewrite Rules, see Andy Taylor's post in the Pi-Star User Forum: New Overlay for DMRGateway
- If you want to use only a specific system – Choose a BrandMeister (BM), DMR+, FreeDMR, TGIF, or HB master. With any of these, everything is simpler as you'll see only options specifically for the selected system.
- ☆ DMR ESSID – If you are using an extended SSID (ESSID), select the extension. Note: Normally, you should make sure that you're logged into DMR in only one place, or else that you are using different CCS7/DMR IDs for each login instance (for example, if you're running DMR on one hotspot and YSF2DMR on another). However, on the BrandMeister, DMR+, FreeDMR, TGIF, and HB networks, you have the option of appending a two-digit extension (00 - 99) to your regular CCS7/DMR ID so that the network can distinguish between your logins. Some DMR Plus servers use single-digit extensions. Personal, low-power hotspots also can use ESSIDs (but repeaters don't).
- ☆ Set up the options for the DMR system(s) you enabled:
- BrandMeister Master – Choose a nearby master server.
Note: On Apr 23, 2021, BrandMeister USA announced that they will decommission Master Server 3101 by Dec 1, 2021. They are asking users to move to the new Master Server 3104. Announcement PDF
- BM Hotspot Security – [Required as of Dec 2020 for U.S. Servers] Once you have enabled a Hotspot Security password in BrandMeister SelfCare (instructions
 ), enter it here to enable your hotspot to access the BrandMeister Network. This provides an extra level of security, preventing others from accessing the BrandMeister Network using your CCS7 ID.
Note: You can set up only one BM Hotspot Security per CCS7 ID (the first seven digits), so even if you set up multiple ESSIDs for one CCS7 ID, you can use only one password for all of them.
- BrandMeister Network Enable – Toggle the BrandMeister network on/off.
- BrandMeister Network – Click Edit Repeater to edit settings via BrandMeister My hotspots for your CCS7 ID.1
- DMR+ Master – Choose a nearby master server.
- DMR+ Network Options= – Set up any options you want to use.1
- Note 1: If you don't want to auto-connect to any talkgroup (when Pi-Star is set up as a hotspot), use:
StartRef=4000;RelinkTime=60;UserLink=1;TS1_1=9; - Note 2: If you turn off DMR Mode via MMDVMHost Configuration, these options aren't saved, so when you turn on DMR Mode again with DRM+ or DMRGateway set as the DMR Master, you'll need to re-enter these options.
- Note 1: If you don't want to auto-connect to any talkgroup (when Pi-Star is set up as a hotspot), use:
- DMR+ Network Enable – Toggle the DMR+ network on/off.
- XLX Master – Choose the XLX master server you want to use.
- XLX Startup Module – XLX reflectors are set up with default module (A, B, C, etc.). Optionally, you can select a different module.
- XLX Master Enable – Toggle the XLX master on/off.
- BrandMeister Master – Choose a nearby master server.
- DMR Color Code – Personal hotspots typically use color code 1.
- DMR EmbeddedLCOnly (Embedded Link Control Only) – The default is off. Turning it on disables the Talker Alias data that is sent by MMDVMHost. If you are experiencing audio drop-outs from some stations, you might want to try turning this option on.
- Note 1: Apparently, different stations and radios encode and decode Talker Alias data in different ways. One way this variance manifests is that some models of radios can experience audio drop-outs when receiving Talker Alias data from some stations.
- Note 2: Link Control data = ID headers, talkgroup, and private calls.
- DMR DumpTAData – The default is on. Controls whether Talker Alias
 data is logged in the /var/log/pi-star/MMDVM-YYYY-MM-DD file. If you're not using Talker Alias, you can turn this option off.
If any changes made, click Apply Changes.
[1] For more info related to the way DMRGateway works with networks, see:
DMRGateway notes![]() · BrandMeister dynamic, static, and auto-static talkgroups
· BrandMeister dynamic, static, and auto-static talkgroups![]() · Constellation reflectors
· Constellation reflectors![]()
See also: BrandMeister talkgroup list![]() · DMR+ reflector list
· DMR+ reflector list![]()
☆ DMR cross-mode configuration
Pi-Star supports the capability to run DMR2YSF and DMR2NXDN cross modes. For more info, see Pi-Star cross modes![]() .
.
☆ 5e) D-STAR Configuration

- RPT1 Callsign – Autofilled with the callsign from General Configuration.
☆ RPT1 Module – The hotspot module you want radios to connect to, by default, set to the B module, which is typically used for UHF hotspots. - RPT2 Callsign – This is set up automatically with the module set to G for Gateway. This is why it's so important to set up your D-STAR radio properly.
- For more info, see above: 1d) Using D-STAR? Be sure to set up your radio properly!
- Remote Password 2 – ircDDBGateway is the gateway app for D-STAR mode. Per Andy Taylor in the Pi-Star Users Support Group: "the ircDDBGateway password on the dashboard is for ircDDBGateway remote."
- Note: This is different from the Remote Access Password (see section 5m below) that is used for accessing the Pi-Star Admin and Configuration settings, as well as for SSH access.
- ☆ Default Reflector – You can select your default reflector, as well as whether you want Pi-Star to connect to it automatically when it starts up.
- Note: Per Tom, W1TG, in the Pi-Star User Forum, you also can specify a reflector reconnect time in the Expert Editor > ircDDBGateway tab > reconnect1 setting, where you can specify a default time of inactivity after which Pi-Star will automatically reconnect to the default reflector: 0 = Never, 1 = Fixed (I'm not sure how this works), 2 = 5 min, 3 = 10 min, 4 = 15 min, 5 = 20 min, 6 = 25 min, 7 = 30 min, 8 = 60 min, 9 = 90 min, 10 = 120 min, 11 = 180 min. If this value is set to a time, it will "reconnect" even if it wasn't previously connected, for example, if the Default Reflector is set to Manual and you didn't manually connect to it.
- ☆ ircDDBGateway Language – Pick one you understand.
- ☆ Time Announcements – If enabled and when D-STAR mode is enabled, you'll hear time announcements at regular intervals, by default every hour.
- Note: If enabled, the TimeServer Status will be green. Interval can be set in the Expert Editor > TimeServer: 0 = every 15 minutes; 1 = every 30 minutes; 2 = every 1 hour.
- Callsign Routing – Enable if you want callsign routing for D-STAR.
- Use DPlus for XRF – Related to using X-Reflectors (XRF): If your router doesn't support automatic uPNP port forwarding and you don't want to manually set up port forwarding for X-Reflectors, you can enable this option to make it possible for Pi-Star to connect to all X-Reflectors 3.
Important! If you change this option, you must update. See below: Updating Pi-Star.
If any changes made, click Apply Changes.
[2] David, PA7LIM, the ham behind the BlueDV apps, also created Android and i0S "ircDDB Remote" apps, which handle REF, XRF, and DCS reflector connections. For more info, see the videos:
- irdDDB Remote Android app
 , by Michael Carey, VK5ZEA.
 - ircDDB Remote Control Pi-Star (for iOS)
 , by David Cappello, KG5EIU.
[3] X-Reflectors that use either the older Dextra protocol or the FreeStar protocol require port forwarding in order for Pi-Star to connect to them. This doesn't apply to X-Reflectors running the newer Dextra Enhanced protocol. If you want to manually set up port forwarding, see the note: Port forwarding![]() .
.
☆ 5f) Yaesu System Fusion Configuration (YSF Config)

- ☆ YSF Startup Host – Choose the YSF startup host you want to use.
Hint: Don't choose Parrot as your startup host as that setting can interfere with using the WiresX All button to see the Reflector List. Thanks to Jordan, WC6J for figuring this out.
- UPPERCASE Hostfiles – Some Yaesu radios—for example, the FT-70D—support searching YSF and FCS rooms only in UPPERCASE. Once this option is enabled, whenever a Pi-Star Update is performed, the hostfiles containing YSF and FCS rooms will be converted to UPPERCASE.
- WiresX Passthrough – If you are using any of the YSF cross-modes, this provides a method to pass the WiresX commands from your radio through to the cross mode, so you can drive everything from the radio. For more info, see the WiresX Auto Passthrough
 topic in the Pi-Star User Forum.
If any changes made, click Apply Changes.
See also: YSF reflector list![]() · FCS reflector list
· FCS reflector list![]() . The reflector lists include the YSF DTMF codes.
. The reflector lists include the YSF DTMF codes.
☆ YSF cross-mode configuration
Pi-Star supports the capability to run YSF2DMR, YSF2NXDN, and YSF2P25 cross modes. For more info, see Pi-Star cross modes![]() .
.
☆ 5g) P25 Configuration

- ☆ P25 Startup Host – Select your preferred startup host.
Note: If you want to add a custom P25 reflector to Pi-Star, watch the P25 Host File Update video by Craig, W1MSG.
 - ☆ P25 NAC – Enter your P25 Network Access Code.
If any changes made, click Apply Changes.
See also: P25 reflector list![]()
☆ 5h) NXDN Configuration

Make sure your ZUMspot/MMDVM_HS firmware is updated to v1.4.0![]() or higher.
or higher.
- ☆ NXDN Startup Host – Select your preferred startup host.
- Note 1: NXDNGateway was enabled in V3.4.12. The standard port for NXDN reflectors is 41400.
- Note 2: If you want to add a custom NXDN reflector to Pi-Star, see the note: Adding a custom NXDN reflector to Pi-Star
 .
.
- ☆ NXDN RAN – Enter your 2-digit (1 - 64) NXDN Random Access Number.
If any changes made, click Apply Changes.
See also: NXDN reflector list![]() · NXDNInfo.com
· NXDNInfo.com![]() – NXDN CAI and its application to Amateur Radio.
– NXDN CAI and its application to Amateur Radio.
☆ 5i) POCSAG Configuration

POCSAG is an asynchronous protocol developed by the Post Office Code Standardisation Advisory Group that is used to transmit data to pagers. The DAPNET![]() (Decentralized Amateur Paging Network) network, which is operated by amateur radio enthusiasts, is based on POCSAG.
(Decentralized Amateur Paging Network) network, which is operated by amateur radio enthusiasts, is based on POCSAG.
- ☆ Server – Select the POCSAG network you want to use.
- ☆ Node Callsign POCSAG – Enter the POCSAG node callsign.
- ☆ Radio Frequency POCSAG – Enter the POCSAG radio frequency you want to use. 439.9875 MHz is the most commonly used frequency.
- Per Andy Taylor in the Pi-Star User Forum
 : "If we get good buy in from repeater keepers, we could have a really good paging network with great coverage, especially if we all use the same standard frequency."
 - Important! Avoid frequencies used for other purposes, for example, 435.0 - 438.0 and 145.8 - 146.0, used internationally for satellite communication, which can be disrupted by even low power hotspot transmissions.
- Pi-Star reminder: Beginning with dashboard v20181217, when you change a frequency, the frequency field displays red when it is within the satellite range and green when it is safely outside that range. Pi-Star itself doesn't enforce frequency ranges; however, hotspots running firmware ZUMspot/MMDVM_HS v1.4.12 or later
 won't work on satellite frequencies.
 - Band plan: For frequency help, see your country's band plan. For example, for the U.S., see: U.S. Band Plan
 . For the U.S. State of Colorado, see: Colorado Frequency Use Plans
 (especially, CCARC Guidelines on Hotspots
 ). To find links for other U.S. states, refer to the Amateur Radio: Frequency Coordinators
 list by Tom, W2XQ. See also the info posted by Ron, VE1AIC: Digital Voice frequencies
 .
. - Note: The default POCSAG frequency is outside satellite frequencies, but if you change it to a frequency in the blocked range, it can cause problems even if the POCSAG mode is not enabled.
- Per Andy Taylor in the Pi-Star User Forum
- ☆ DAPNET AuthKey – Enter your authorization key for the Decentralized Amateur Paging Network.
- Whitelist – Set your Radio Identity Codes (RICs; a.k.a., Capcodes) whitelist, comma-separated. If these are set, only these RICs will be transmitted..
- Blacklist – Set your RICs blacklist, comma-separated. If these are set, any other RICs will be transmitted, but not these.
- Local POCSAG – As of Pi-Star V4.x.x, it is possible to send a POCSAG message locally via your hotspot without using the DAPNET API. You must enable the Remote Control feature in MMDVMHost. The syntax is:
sudo RemoteCommand <port> page <RIC> "<message>"
- Per Andy Taylor in the Pi-Star User Forum
 , "You need to specify the <port>, usually 7642, "page" specifies that this is a local page to be sent over RF only, <RIC> is the RIC number of the pager (NOT the callsign), and <message> is the message you want to send."
- Per Andy Taylor in the Pi-Star User Forum
- POCSAG was added in Pi-Star V3.4.16, and via the ZUMspot/MMDVM_HS firmware v1.4.1
 .
. - There's a good setup guide written by Steffan, DO6DAD, posted on the DAPNET DokuWiki
 . Kevin, W1KMC, posted a good configuration explanation on the Pi-Star User Forum
 .
. - For additional related settings, see Expert Editor > MMDVMHost > POCSAG.
If any changes made, click Apply Changes.
★ 5.3) Additional configuration settings
- 5j) Mobile GPS Configuration
- 5k) Firewall Configuration
- 5l) Wireless Configuration
- 5m) Auto AP SSID PSK & Remote Access Password
- Jump up to: 5.1) Basic configuration settings
- Jump up to: 5.2) Digital mode configuration settings
5j) Mobile GPS Configuration

If you have a GPS unit attached to your hotspot, you can enable Mobile GPS to update your GPS coordinates.
5k) Firewall Configuration

Dashboard Access, ircDDBGateway Remote, SSH Access
Note: These settings have no effect if your router doesn't support uPNP or you disabled either your router's uPNP or Pi-Star's uPNP setting (see previous).
These settings are used for accessing the dashboard remotely, from outside your network. Per Andy Taylor in the Pi-Star Users Support Group: "These settings tell the uPNP daemon to request port forwards from your router."
- Dashboard Access: requests TCP/80
- ircDDBRemote Access: requests UDP/10022
- SSH Access: requests TCP/22
Auto AP (Auto Access Point)
The Auto AP feature, which works with the Raspberry Pi 3, Zero W, and newer was added in version 3.4.11. If the feature is enabled (which is the default), after Pi-Star boots up (takes about a minute), it will attempt to connect to a known WiFi network. If it can't connect within another two minutes after boot up, Auto AP automatically activates its own network access point, which you can use to connect to Pi-Star in order to configure WiFi settings.
Auto AP makes it easier to connect to a new WiFi networks when you start Pi-Star for the first time or when you need to connect to a new WiFi network, for example, when traveling. For more info, see above: 4) Booting up Pi-Star.
Some additional notes about Auto AP:
- Auto AP is enabled by default.
- You can use Auto AP to connect to new networks, for example, when traveling.
- If you're not intending to connect to new networks, you don't need to leave Auto AP enabled. In fact, it can be advantageous to disable it in certain situations.
- Thanks to Ron, AE5E, for pointing this out to me. He and a group of friends he helps out with their hotspots were experiencing a problem with their hotspots that they used to connect to their home and work WiFi networks, and while driving back and forth (via their cellphone hotspots). If Auto AP was enabled, the transition from one connection to another would frequently fail and the hotspots would go into Auto AP mode, requiring a power cycle to re-establish a connection. Worse, they experienced multiple instances of microSD card corruption during this process, so often that they started carrying spare cards with copies of their images. Once they disabled Auto AP, the problem completely disappeared. They report that once Auto AP is disabled, Pi-Star will search through all the saved wireless connections, and will then repeat the search seamlessly, so it never needs to be power cycled.
- Auto AP supports a few 3rd-party WiFi cards (limited by the Linux driver).
- Auto AP also enables connection sharing, so if you connect your hotspot via ethernet cable to a network or tether it to your phone via USB, you also can share the internet connection with other devices.
uPNP (Universal Plug and Play)
Note: If your router doesn't support uPNP or you disabled your router's uPNP capability, then this setting has no effect.
- If this Pi-Star uPNP setting is enabled, then Pi-Star will create its own port forwarding firewall rules for use with D-STAR.
- Pi-Star has always made these port forwarding requests. This setting gives administrators the option to disable these requests.
- If this setting is off, then uPNP is disabled for all of Pi-Star, including Dashboard Access, ircDDBGateway Remote, and SSH Access (see next).
If any changes made, click Apply Changes.
Note: Billy, KB4AAA, posted an interesting method in the Pi-Star User Forum for remotely accessing the Pi-Star dashboard privately without needing to change the IP address or forward ports: Ultimate remote dashboard access![]()
★ 5l) Wireless Configuration
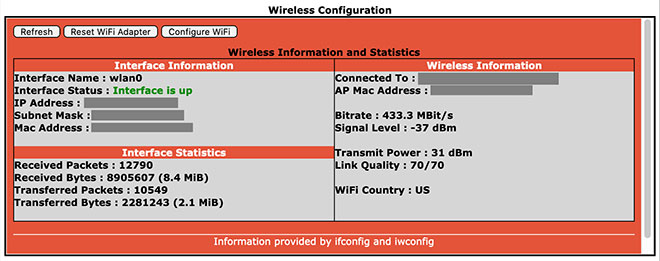
- To add or modify your WiFi network connections, click Configure WiFi.
- You then have two options:
Scan for WiFi networks- Select your country code, and then click Scan for Networks. Wait 10 secs. If the scan doesn't find the network you want, you can add it using the manual method described next.

- In the list of networks found, select the one you want.
Important! Some radio/modem boards require the WPA or WPA2 security standard, and won't work with WEP.

- Select your country code, and then click Add Network.

- SSID: Type the wireless network name. Note: A space in the network name can cause problems with connecting to some routers.

- Select your country code, and then click Scan for Networks. Wait 10 secs. If the scan doesn't find the network you want, you can add it using the manual method described next.
- PSK: Type the wireless network password. The PSK field will turn green.

- Click Save (and connect). It may not look like anything is happening, but give it time until it's finished and the PSK field turns white again.
- - - - - - - - - - - - - - -
Auto AP note: If you're setting up a wireless connection using Auto AP, this step will only save; it won't connect. Wait a few moments for the save to complete, and then power your hotspot off and back on again.
- While the hotspot is restarting, reconnect your computer to the regular WiFi network you're using.
- After the hotspot reboots, Pi-Star will connect to the new WiFi network.
- Optionally, you can add additional wireless network connections. If you have multiple wireless network connections, when you boot up Pi-Star, it will scan each one in turn based on its priority until it finds one to connect to:
- Be patient, each connection attempt takes about 40 seconds.
- The first wireless network connection you add is given an ID of 0 and a priority of 100. For each additional wireless network connection you add, the ID is increased by one and the priority is decreased by one. Thanks to Bob, N0YWB, for his post in the Pi-Star Users Support Group explaining how this works.
- For more info, see: Manually adding WiFi settings to RPi
 .
.
Hint 1: If you have one or more WiFi networks set up and choose to use an Ethernet connection instead of WiFi in location where both are available, you can temporarily turn off WiFi if you're running Pi-Star 4.x. Log into Pi-Star via SSH and then run: sudo rfkill block wifi. To re-enable WiFi, simply reboot Pi-Star, or run: sudo rfkill unblock wifi. Thanks to Tom, PA2TSL, for this hint in the Pi-Star User Forum.
Hint 2: If you need to set a static IP address for your hotspot, you can edit the /etc/dhcpcd.conf file to add the entries, for example:
interface wlan0
static ip_address=10.0.0.11/24
static routers=10.0.0.1
static domain_name_servers=10.0.0.1
Thanks to Dan, KA5TAA, for this hint.
★ 5m) Auto AP SSID PSK & Remote Access Password
Auto AP SSID PSK
Used to create a unique password for connecting to the Auto AP access point, which would then override the default password, "raspberry".
![]()
This override password is separate from the Remote Access Password (which is used for accessing Pi-Star Admin and Configuration settings, and for SSH access; see following section).
Remote Access Password
Used for accessing Pi-Star Admin and Configuration settings, and for SSH access.
★ Strongly recommended: In order to protect your settings and network, change the password from the default to something stronger and more challenging to hack. A challenging password is even more critical if you make your dashboard publicly accessible in the Firewall Configuration section.

- The user name is pi-star, and can't be changed. This is different from the Hostname that can be changed in the General Configuration settings.
- In the Password field, type your new password, preferably something long and strong.
Note: Some special characters work for accessing Pi-Star Admin and Configuration settings, but not for SSH. For example, a tilde symbol (~) works for logging into Pi-Star Admin, but not for signing in via SSH.
Hint: In general, avoid using special characters in the password that may cause issues, such as: ?{}|&~!()^" - Confirm your password. Once you have typed an identical password, the field turns from red to green.
- Once you get the green confirmation, click Set Password.
- Once the password has been set, the Authentication Required dialog box will be presented, and you can sign in using your new password.
6) Running Pi-Star
Once you've finished the initial configuration, running Pi-Star is easy. Just start your hotspot and give Pi-Star a minute or so to fully boot up. As long as you have your radio set up correctly, you can then start using digital modes.
Important! The regulations and best practices that apply to amateur radio—including use of frequencies, control of our stations, and on-air courtesy—also apply to our use of personal, low-power hotspots. It's our responsibility to understand and adhere to those regulations and best practices. My personal practice is that I power on my personal, low-power hotspots only when I'm monitoring and in control of them, adhere to my local band and frequency use plans, and leave adequate pauses between transmissions. For more about this, see Hotspot best practices![]() .
.
Important! A common issue with new hotspots is high Bit Error Rate (BER > 1%). If you experience this when transmitting, see Fine tuning to reduce high BER![]() .
.
6a) Dashboard view
Optionally, you can open the Pi-Star dashboard on any Windows, Mac, or Linux computer (not the hotspot) connected to the same network as the hotspot by browsing to (use trailing slash) http://pi-star/ for Windows, or http://pi-star.local/. Enabled modes are highlighted green, and you can monitor activity.
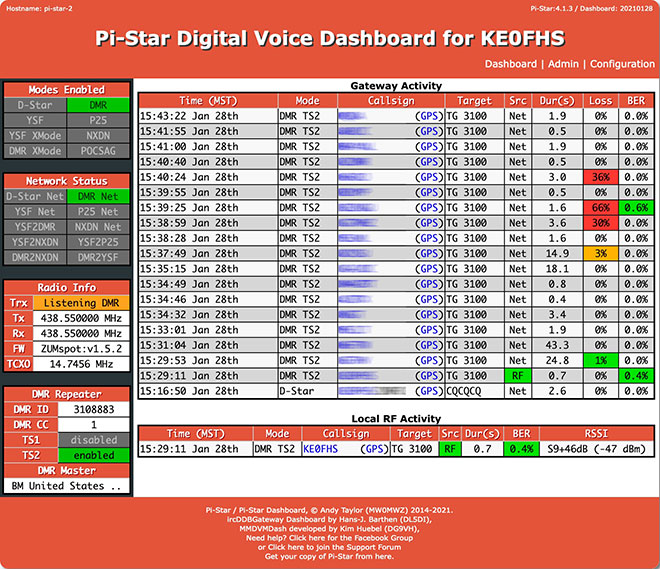
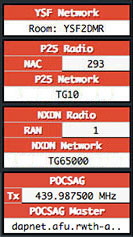 Hint: Click callsign to open linked info page at RadioID or QRZ (to switch between the two: Expert Editor > CSS Tool > Lookup > enter Service name exactly: QRZ or RadioID). Click GPS to open linked coordinates page.
- Bandwidth: The dashboard is optional and takes a lot of bandwidth. If you have a metered data plan, you might want to run Pi-Star without it most of the time.
- Src (source): Displays RF (Radio Frequency) when you transmit from your radio to the hotspot, which then sends data via internet. Displays Net (internet) when data is being received from internet by hotspot, which retransmits as RF to your radio.
- Loss: Indicates data quality loss on data coming in from internet.
- Modes & cross modes: When enabled, their info is displayed in left column.
6b) Admin view
To see more info, switch to the Admin view (requires authentication).
Info and manager modules – The upper portion of Admin view shows Gateway Hardware Info and Service Status, as well as modules for D-STAR Link Info and Manager, BrandMeister Active Connections and Manager, YSF, P25, and NXDN Link Managers, and on the left: Modes Enabled, Network Status, and Radio Info.
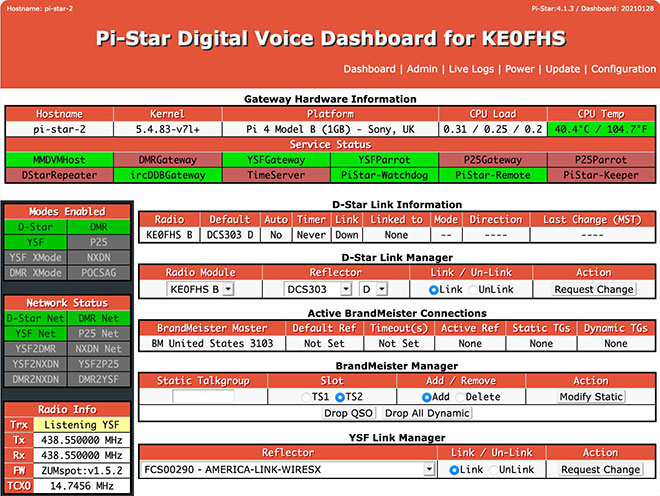
- BrandMeister Manager module: If you use BrandMeister SelfCare
 , you have the option to turn on the BrandMeister Manager. For more info, see the note: Pi-Star's BrandMeister Manager module
 .
.
See also Using the BrandMeister API by Vladimir, AC2F .
. - Link Managers: Optional way for reflector linking/unlinking. The D-STAR Reflector list includes a Text Entry option for linking to reflectors and repeaters. See also Linking to reflectors from the command line
 .
. - CPU: Averaged over 1 / 5 / 15 mins; single-core load: 0.70 = 70%; quad-core load: 2.80 = 70%.
Temp: < 50°C (122°F) = green; ≥ 50° < 69°C (156.2°F) = orange; ≥ 69°C = red. - Network Status: If one of your DMR services is failing to log in, DMR Net will be highlighted yellow.
- Tooltips provide additional info: For example, Hostname = IP Address; Platform = Uptime.

- Here's how the Radio Info TRX section works (for simplex modems):
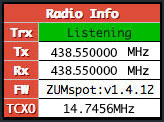
- When you are connected to one or more modes and there is no activity on any of them, the Radio Info TRX section will be green and will display "Listening." If multiple modes are enabled, while in this status, the modem will monitor all active modes in turn:
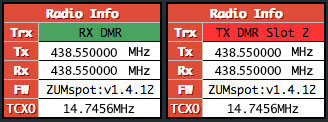
- If you transmit and the modem receives it, the Radio Info TRX section will be green and will display "RX [mode]." If the modem receives a transmission from someone else and transmits it to your radio, the Radio Info TRX section will be red and will display "TX [mode]" (if the mode is DMR, it also displays the time slot). While in the TX status, you can't break in with your own transmission.
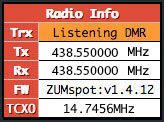
- Immediately after RX or TX status and for the length of the hangtime, the TRX section will be orange and will display "Listening [mode]." While in this status, you can transmit or receive, but only in the mode that the modem is listening to:
- If no new activity occurs during the hangtime, the TRX section will revert to general "Listening." While is this status, you can transmit or receive in any active mode.
Activity modules – The lower portion of Admin view displays activity modules.
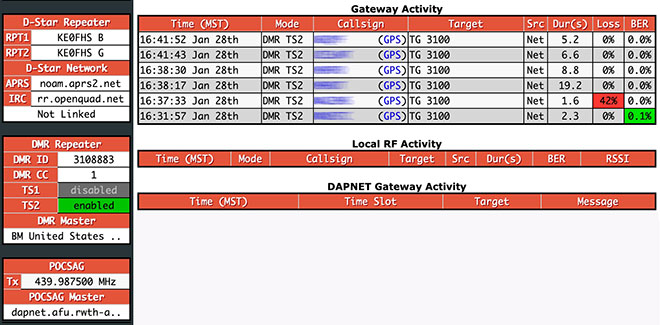
- D-STAR IRC: IRC: rr.openquad.net shows that Pi-Star is set up to use QuadNet. For more info, see: QuadNet Smart Groups
 .
. - D-STAR RSNC: In the Local RF (Radio Frequency) Activity module, if you see your callsign followed by
/RSNC, that means the receiving station didn't get the beginning frames of your transmitted digital packet, which happens when a hotspot doesn't lock onto your Tx mode quickly enough when scanning modes. - Target field: "Blocks" (for example, TG 3100, 5 blocks) indicates non-voice data such as GPS or SMS.
6c) Live Logs view
From the Admin view, you can select the Live Logs view, which starts a more detailed live logging process that can be useful for troubleshooting. It can be helpful to open Live Logs view in a new tab or a different browser so you can look back and forth between the dashboard and the log.
There also are more specific logs you can check in the /var/log directory:
- For example, there are specific logs in var/log/pi-star/ for ircDDBGateway, MMDVM, etc. Thanks to Luis, CT1DVM, for pointing this out. To see a list of the logs available, log into Pi-Star via SSH and type:
ls -l /var/log/pi-star - For the overnight updates: /var/log/unattended-upgrades/unattended-upgrades.log. Thanks to Tony, W7EFS, for pointing this out.
Hint: There's a link at the bottom of Live Logs view to download it as a text file. Key: D = Debug; M = Message; I = Info. See also: Pi-Star troubleshooting![]() .
.
6d) Changing active modes
If you want to change which modes are active, open the Configuration view and in the MMDVMHost Configuration section, switch modes and cross modes on and off as wanted, and then apply changes.

7) Backing up and restoring Pi-Star
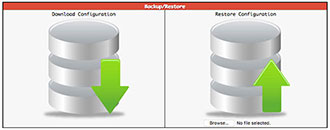
After you've done all the work of setting up Pi-Star just the way you want, it's a good idea to back it up. In Configuration view, click the Backup/Restore link.

In the Backup/Restore view, click Download Configuration, and then choose a location to safely store your work so that if things ever get messed up you can easily restore your most recent working configuration.
Some settings are not backed up, so if you changed them to something other than their default, you'll find that they are set back to their default after you run a restore, for example:
- General Configuration:
- System Time Zone (default Europe/London)
- Dashboard language (default English_uk)
- D-Star Configuration – Time Announcements (default: On) and Use DPlus for XRF (default: Off). If you change the Use DPlus for XRF setting, you must run a Pi-Star Update to put the new setting into effect.
- Firewall Configuration – Auto AP (default: On)
- Remote Access Password – (For more info about this password, see section 5m.) For security reasons Pi-Star backup does not back up this password, and restoring your configuration settings from a backup will not reset this password. If you changed this password from the default "raspberry" to a stronger custom password (which for security purposes is a good idea), then subsequently forgot that custom password, the easiest thing to do is start over with a fresh Pi-Star image to regain access to Pi-Star Admin. and Configuration settings, as well as SSH access. Once you have installed a fresh image, you can restore your saved configuration to restore your other settings.
- Override hosts files – Override hosts files in the root directory aren't backed up. Make a copy of them if you want to manually restore them.
- SSH Public Key Authentication (PKA) – This is a bit of an edge case, but if you're using PKA to access Pi-Star via SSH, Pi-Star doesn't back up the custom settings (public key stored in an authorized_keys file in a custom folder named .ssh in the user's home directory). So if you do this (as an alternative to logging into Pi-Star via SSH using your Remote Access Password), you must configure this again after booting up your fresh install.
8) Updating Pi-Star
![]()
Standalone article: Updating and upgrading Pi-Star![]()
Related article: Updating hotspot firmware via Pi-Star![]()
One of the nice things about Pi-Star is that it's updated on a regular basis to add new features, options, and fixes, as well as to add hostfile updates that have been pulled from upstream sources (to view the changes, see GitHub![]() ). There are three ways to update Pi-Star: one automated and two manual:
). There are three ways to update Pi-Star: one automated and two manual:
- Automated overnight updates – This type of update runs every night (between 3:00 and 4:59 AM locally) as long as your hotspot is on and connected to the internet. It uses standard Raspberry Pi OS tools to update the radio binaries (MMDVMHost and DStarRepeater), gateways (DMRGateway, ircDDBGateway, etc.), hostfiles, and dashboard. If you are going to leave your hotspot on overnight, remember that you must adhere to the regulations that apply to amateur radio, including control operator rules.
- Manually launched updates – You may want to manually launch an update if you've heard there was a fix released or updated hostfiles are available and you don't want to wait for the automated overnight update, or if you want to update the Raspberry Pi OS operating system. You also should perform an update before running an upgrade.
- Via the Pi-Star dashboard – You can run an update at any time by clicking Update in the Admin view (or in the Expert Editor). This type updates the radio binaries, gateways, hostfiles, and dashboard, but not the Raspberry Pi OS.

In Update view, you'll see the process running. Let it run until finished.

- Via SSH Command Line Interface (CLI) – You also can run an update at any time via a Secure Shell (SSH
 ) app like Termius
 or PuTTY
 . This is the most robust way to run an update as it updates the radio binaries, gateways, hostfiles, and dashboard, as well as the Raspberry Pi OS operating system updates, including giving you the chance to take care of those steps of Raspberry Pi OS updates that require manual input.
- Use an app to SSH into Pi-Star and log in.
- Run the update (the update process automatically switches Pi-Star to Read-Write mode, so there's no need to switch manually):
sudo pistar-update - Important! If the process pauses and asks whether a modified file should be replaced, your answer should always be the default, which is to leave the modified file alone.
- Allow the update process to run until you see:
Updates complete, sleeping for a few seconds before making the disk Read-Only

Finished - After a manual update, it's a good idea to open the Configuration page and click Apply Changes.
- Via the Pi-Star dashboard – You can run an update at any time by clicking Update in the Admin view (or in the Expert Editor). This type updates the radio binaries, gateways, hostfiles, and dashboard, but not the Raspberry Pi OS.
9) Upgrading Pi-Star
![]()
Standalone article: Updating and upgrading Pi-Star![]()
Related article: Updating hotspot firmware via Pi-Star![]()
Upgrading to V4.1? See Upgrading to Pi-Star V4.1![]()
The less frequent Pi-Star version upgrades makes operating system-level changes to the system services and packages required to support new features. Both the update and upgrade processes automatically switch Pi-Star into Read-Write mode, so there's no need to switch manually.
- Use an app to SSH into Pi-Star and log in. Or you can use the Update and Upgrade links in the Expert Editor (see the following section).
- Begin with an update of the dashboard and binaries.
In the SSH window:
sudo pistar-update
Or, click the Expert Editor's Update link.
Allow the update process to run until you see:
Updates complete, sleeping for a few seconds before making the disk Read-Only
Finished - Next, upgrade the operating system, services, and packages.
In the SSH window:
sudo pistar-upgrade
Or, click the Expert Editor's Upgrade link. - Beginning with Pi-Star version 4.1.5 / Dashboard version 20210619: It's only necessary to run the Upgrade process once; the process now automatically upgrades all the way to the most recent version.
Prior versions: Run the upgrade process as many times as needed until the system reports you are on the most recent version:
You are already running the latest version…

Sleeping a few seconds before making the disk Read-Only…

Finished - It's a good idea to reboot the hotspot after upgrading.
In the SSH windows:
sudo reboot
Or, open the Power view, and then click Reboot. - The dashboard displays the current version number, for example, 3.4.16.
For more info about what's included in an upgrade: On the Pi-Star Downloads page![]() , scroll down to the Change Log section.
, scroll down to the Change Log section.
10) Expert Editor: advanced Pi-Star configuration
If you are in Configuration view, you can click Expert to access the "Expert Editor," a set of advanced quick editors, full editors, and tools.

You'll be greeted by a **WARNING** message that you should pay attention to:
"Please keep in mind when making your edits here, that these config files can be updated by the dashboard, and that your edits can be over-written. It is assumed that you already know what you are doing editing the files by hand, and that you understand what parts of the files are maintained by the dashboard."
An additional note of caution: If you make changes to settings in the Expert Editor and click Apply Changes there, and then subsequently you make changes on the Configuration page and click Apply Changes there, your original changes in the Expert Editor might be reverted to their default settings. This is intentional behavior. Pi-Star is designed to be easy to use for users who won't normally use the Expert Editor. If you decide to use the Expert Editor, you'll be best served if you subsequently do all of your configuration via the Expert Editor.
The Expert Editor provides access to:
- Upgrade link
- Quick Editors:
- DStarRepeater
- IrcDDBGateway
- TimeServer
- Used by the ircDDBGateway service for time announcements.
- MMDVMHost 4
- DMR GW (Gateway)
- YSF GW
- P25 GW
- NXDN GW
- DAPNET GW
- Full Editors:
- DMR GW (Gateway)
- PiStar-Remote
- Provides configuration options for RF (Radio Frequency):
- The Pi-Star Keeper remote control system, an RF KillSwitch for repeater keepers.
- Some basic remote control ability via RF. For more info, see the note: Watchdogs, Remote RF commands, and Keepers
 .
.
- Provides configuration options for RF (Radio Frequency):
- WiFi (wpa_supplicant.conf configuration)
- BM API Key
- See the note: Pi-Star's BrandMeister Manager module

- See the note: Pi-Star's BrandMeister Manager module
- DAPNET API
- Related to POCSAG.
- System Cron
- Hint for repeater owners: Andy Taylor posted the code for linking, fixed linking, and unlinking to reflectors via a cron job in the Pi-Star User Forum
 .
.
- Hint for repeater owners: Andy Taylor posted the code for linking, fixed linking, and unlinking to reflectors via a cron job in the Pi-Star User Forum
- RSSI Dat
- Maps the raw RSSI values to dBm values to send to the DMR network.
- Tools:
- CSS Tool
- See the note: CSS Tool
 .
.
- See the note: CSS Tool
- Built-in SSH Access window
- This is an implementation of Shellinabox, a web-based terminal emulator that runs a web-based SSH client. This can be convenient for some things, but it's best not to use it for running the Pi-Star Update process as it sometimes breaks it. Use an SSH app instead.
- CSS Tool
[4] MMDVMHost DMR Network Jitter setting note: There's a good explanation about this by Andy Taylor in the Pi-Star User Forum (edited slightly for clarity): "Jitter is the difference in round trip times [pings] between two points…. It's quite normal for the answers from each ping to vary slightly, this can happen for a whole load of reasons, but it's the difference between those times that is the jitter: too large = slight delay on the start of a transmission, so slow, choppy audio and higher BER (potentially). For audio packets to give you the best performance, you need two things: low round trip time (lower is always better, it's a function of bandwidth and distance) and steady jitter. If the software knows that you are using a master with high jitter it will attempt to account for it."
10a) Updating hotspot firmware via Pi-Star
It's possible to update the firmware of several hotspot boards via Pi-Star, including the ZUMspot. See the note: Performing firmware updates via Pi-Star![]() .
.
10b) Other advanced configuration notes
See Pi-Star notes![]() for other advanced configuration notes, including:
for other advanced configuration notes, including:
- Pi-Star SSH Access

- Expanding the filesystem

- Fine tuning for high BER

- Manually adding WiFi settings to RPi

- Re-syncing system time and changing date format

11) Rebooting or shutting down Pi-Star
For a graceful way to reboot or shut down your hotspot, click the Power link.

In the Power view, click Reboot or Shutdown. Give your hotspot a minute or two to complete rebooting or shutting down.

Note: When you have a modem like the ZUMspot mounted on a Raspberry Pi, after Pi-Star shutdown is complete, the modem will continue to flash its mode lights (because power is still flowing through the shut down RPi to the modem) until you actually turn off the power to the RPi.


